PEMWIDGET Integration Guide on third-party websites
PEMWIDGET
our PEMWIDGET was developed specifically to be easily integrated into third-party websites and customised for your specific needs.
In order to use our PEMWIDGET, it is necessary to have contacted the sales department, which will issue activation codes.
CONFIGURATION
PEMWIDGET can be configured to operate in the following modes:
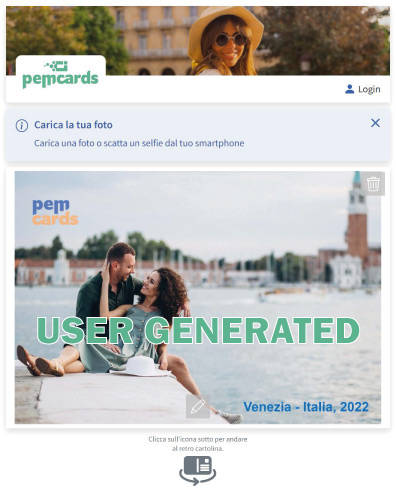
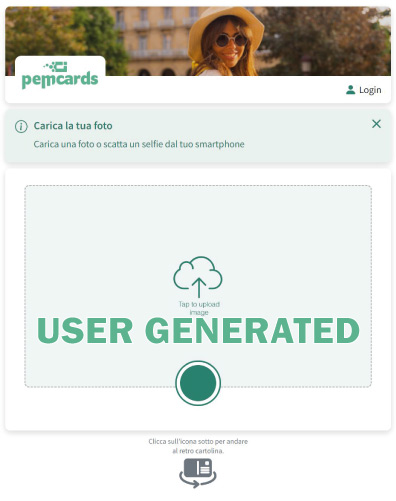
a) With user-uploaded photos (User Generated)
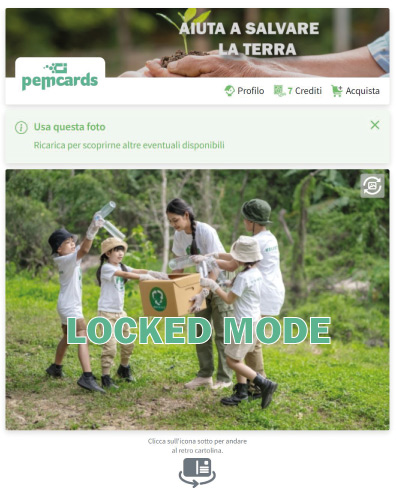
b) With pre-loaded images from the integrator (Locked Mode)
c) With validation of credits provided to the user (Coupon Mode)
d) With credits purchasable online by the user (Payment Mode)
e) With both options c) and d) active (Mixed Mode)
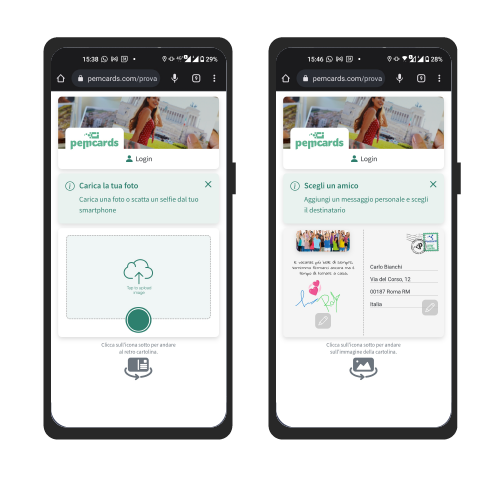
The PEMWIDGET is a portion of code, installable on the third-party Internet domain, which gives the end user the possibility of creating a postcard directly from the host Internet site. The PEMWIDGET is connected by digital flow to the PEMCARDS system on which it is dependent and connected, transmitting all the information necessary for correct data management for the creation of the postcard.
The PEMWIDGET is highly parameterisable; by activating or deactivating certain internal functions, the software functions can be expanded.
The Partner can decide the mode of operation and the options displayed by the end user, for example:
a) With user-uploaded photos (User Generated);
b) With pre-loaded images from the integrator (Locked Mode);
c) With validation of credits provided to the user (Coupon Mode);
d) With credits that can be purchased online by the user (Payment Mode);
e) With both options c) and d) active (Mixed Mode);
In addition, the colours and radius of the buttons can be customised to suit the host website.
Both when previewing the back of the postcard and when printing, your customised graphic banner can be inserted

The PEMWIDGET is normally installed in just a few minutes on any website. Our technical department, once the necessary information has been obtained, will provide the code to be ‘copied and pasted’ directly into the Partner’s page and the PEMWIDGET will be up and running. The PEMWIDGET has been specially developed to be adaptable to the largest implementation cases and end-user usage patterns.
The PEMWIDGET was tested on native browsers such as Chrome, Firefox, Safari and Edge. Different browsers as well as customised variants within the viewer pages of social or HTML platforms may limit or prevent the use of PEMWIDGET.
The PEMWIDGET uses a CDN for the distribution of static content and an endpoint for user management and postcard creation operations. The security and authenticity of the PEMWIDGET is achieved through the use of a Json Web Token (JWT), which verifies that the code has been installed at a site authorised by EMOTION.
The PEMWIDGET is written in pure javascript. At present, no conflicts have been detected with other libraries or frameworks known or tested by EMOTION. Per un utilizzo ottimale, lo script deve essere incluso direttamente nella pagina dove verrà utilizzato, evitando l’utilizzo di iframe. The PEMWIDGET is to all intents and purposes a software, with an advanced image editor. It is highly recommended to paste the code into an empty html page that does not contain headers, menus, footers or other elements that may interfere with the user experience or hinder the anchoring of the modals used. Always test results from both smartphone and desktop. Most end users will use the smartphone mode.
Two environments are available, a test environment and a production environment. It is recommended that the customer integrates the test environment first, this will allow EMOTION and the customer to verify the correct functioning. All cards received in the test environment will not be printed, nor will any accounts, credentials, credits acquired by the customer, etc. be brought into the production environment. The tokens and endpoints are different for the Test environment and the Production environment.

Endpoints to activate the PEMWIDGET
<script src=”https://d1nnlhsh6z98pp.cloudfront.net/js/main.js”></script>
use the following endpoint to point to the development environment.
note: the token provided for the development environment is different from the production one
<script src=”https://d2gnru2qokx8eq.cloudfront.net/js/main.js”></script>
use the following endpoint to point to the production environment.
note: the token provided for the production environment is different from the development environment
The PEMWIDGET is highly parameterisable, enabling or disabling certain functions will enable specific software functions.
The mandatory code part consists of a few lines and 2 necessary initialisation information:
- endpoints, one between production and development;
- pemtoken, specific between production and development. It is supplied by Emotion.
<html lang=”en”>
<head>
<meta charset=”UTF-8″ />
<meta name=”viewport” content=”width=device-width, initial-scale=1.0″ />
<title>Pemcards widget</title>
</head>
<body>
<div class=”pemWidget” id=”pemWidget“></div>
<script src=”https://endpoint.cloudfront.net/js/main.js”></script>
<script>
PemMain.init({
“id”: “pemWidget“,
“token”: “personal token“,
});
</script>
</body>
</html>
“language”:”xx” Set the language of the PEMWIDGET. If not set, the browser language ( it, en, br) will be used. Possible values: – it → Italian – en → English – pt → Portuguese
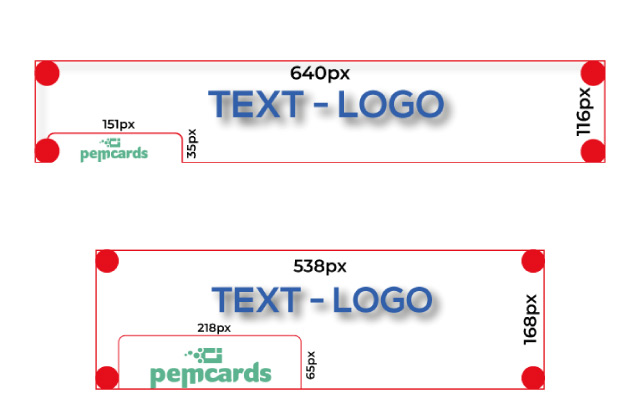
the PEMWIDGET provides two independent images for the header.
a) “headerImage’. for desktop and tablet visualisation
b) “headerImageMobile”. for viewing from smartphones
To avoid possible CORS problems, images must be uploaded directly to the host hosting the PEMWIDGET.
example:
“headerImage”: “./headerImage-desktop.png”,
“headerImageMobile”: “./headerImage-mobile.png”,
dimensions:
- for the desktop/tablet version 640x116px
- for the mobile version 538x168px
You can download and use the template at this link
“publicWorkstation”: true, if set to true, the PEMWIDGET will terminate the current session after 60 minutes, disconnecting the user.
“hideFooter”:true, If set to ‘true’, hides the banner below the PEMWIDGET with the invitation to download the Pemcards application
“payment”:true, if set true, enables the purchase of credits directly within the PEMWIDGET. See note “Product list”. “payment” is the variable which enables Emotion’s payment system. In the case of sales with pre-purchased credits, see the variable ‘paymentCustomer’ described below. If the variable “payment”:true, is not entered in the initialisation of the script, the end customer will only be able to use free credits, i.e. he/she will have no possibility of purchasing from the PEMWIDGET installed on the site. he partner who intends to integrate the PEMWIDGET with the optional “payment” function: true, i.e. the possibility for an end user to purchase credits directly from the PEMWIDGET, has the option of customising the list of credits displayed between PEMCOIN 1 to PEMCOIN 10. The prices displayed to the end user are the ‘end user’ prices set by EMOTION. To display products, the Partner must indicate them in the signed commercial agreement. Upon payment, the user will acquire as many credits as he has purchased directly in his user profile and will immediately be ready to send postcards.
“paymentCustomer”: “customised url”, It is possible to use the ‘Buy Credits’ function without going through Emotion’s direct payment system, but by pointing to an external distribution/sales system. In this case, the credits must be pre-purchased by the integrator/partner and distributed to the end user by means of proprietary systems. Note: In this case, the variable ‘payment’ must not be set to ‘true’.
“qrScan”:true, if set true, enables the possibility of acquiring PEMCOINs supplied in QR Code mode.
“showBannerInfo”:true, if set to ‘true’, displays a contextualised help banner positioned between the menu and the image upload section.
“lightVersion”:true, if set to ‘true’, activates the minimal version of the image and text editing functions, e.g. excludes frames, emoticons, image filters etc.
“geolocationModalOff”:true, If set to true, it deactivates the geolocation request. Geolocation, if left active in the PEMWIDGET, is however a manual option left to the user’s free choice. It is not recommended to deactivate it as valuable data provided by the user will be lost should he or she accept the option.
“socialLoginOff”:true, If set to true, hides the login with Facebook only when using the Instagram browser windget*. * This function is necessary as some browsers create com-patibility problems with PEMWIDGET. See “Compatibility” notes
“includeGoogleMapsJavascriptApi”: true, To be used when the partner’s site already includes the Google API or if there are conflict problems. Check that the MapsJavascriptApi and PlacesApi libraries necessary for the PEMWIDGET to function correctly are set up and activated on the client API key.
“images”: [array] | PEMWIDGET was created primarily to allow users to express their creativity by generating postcards with self-produced images. In the case of events, author’s photos and for special occasions, it is possible to ‘block’ the uploading of images by end users and propose the use of pre-loaded images only. If only one photo is provided, it will be automatically uploaded, alternatively each time the PEMWIDGET is opened or the preview is updated, the proposed image will be a random one from among those uploaded.
More than one image may be indicated by means of an array of image urls. In this case, the PEMWIDGET will present a different image each time it is opened.
For optimal use, images must have the same domain as the installed PEMWIDGET.
“images”: [
“https://ilmiodominio.com/immagini/sfilata_01.jpg”,
“https://ilmiodominio.com/immagini/sfilata_02.jpg”,
“https://ilmiodominio.com/immagini/sfilata_03.jpg”
]


The PEMWIDGET can be integrated into one’s own website by customising the primary colours and radius of the buttons to make it more consistent with the style of the website that will integrate it.
Just tell technical support the primary colour in HEX # format and the radius of the buttons in px.

A function test of the PEMWIDGET is available in the DEMO environment at
https://pemcards.com/postcards-demo/ (Mixed Mode)
https://pemcards.com/event-mode/ (Locked mode)
Login: demo001@email.com Password: demo2022@
EMOTION is constantly updating and developing new PEMWIDGET features.
Any changes, additions, updates, additions are documented at the site:
Technical Support
for information and technical support write toThe width/height ratio must be 1.475
Es. 1003 x 680 px | 2006 x 1360 px etc.
For best rendition it is recommended to load images between 1003 x 680 px and 4012 x 2720 px while maintaining the L / A ratio

An end user from the moment of validation of a free credit or online purchase has 2 years to use the print and delivery service.
After two years, the claim will be considered expired.